

Setting up git GPG commit signing on macOS
Signing your git commits is the best way to prevent impersonation attacks.

Signing your git commits is the best way to prevent impersonation attacks. Let's dive into setting it up via GPG.
Installing GPG
You're going to need Homebrew. Get it here if you don't already have it installed.
Install GPG and pinentry-mac via brew
brew install gpg2 gnupg pinentry-macEnsuring it doesn't break
Sometimes GPG stomps its feet and cries out something about “tty” and “invalid” but the following instructions would shut it up.
Set pinentry-mac as the desired pin entry program:
# Make the directory
mkdir ~/.gnupg

# Tells GPG which pinentry program to use
echo "pinentry-program $(brew --prefix)/bin/pinentry-mac" > ~/.gnupg/gpg-agent.conf

# Secure the directory permissions
chmod 700 ~/.gnupg

# Kill agent to load the new config
killall gpg-agentCreating your keypair!
Generation
Run gpg --full-gen-key to pull up the key generation tool. Follow the choices made below (apart from the personal details).
# Key Type; RSA & RSA
Please select what kind of key you want:
   (1) RSA and RSA (default)
   (2) DSA and Elgamal
   (3) DSA (sign only)
   (4) RSA (sign only)
  (14) Existing key from card
Your selection? 1

# Key Size; 4096
RSA keys may be between 1024 and 4096 bits long.
What keysize do you want? (3072) 4096

# Validity; 0
Please specify how long the key should be valid.
         0 = key does not expire
      <n>  = key expires in n days
      <n>w = key expires in n weeks
      <n>m = key expires in n months
      <n>y = key expires in n years
Key is valid for? (0) 0

# Confirm Selection; y
Key does not expire at all
Is this correct? (y/N) y

# Personal Details
GnuPG needs to construct a user ID to identify your key.

Real name: Test User
Email address: test@fakedomain.faketld
Comment: Workplace Key
You selected this USER-ID:
    "Test User (Workplace Key) <test@fakedomain.faketld>"

Change (N)ame, (C)omment, (E)mail or (O)kay/(Q)uit? O
We need to generate a lot of random bytes. It is a good idea to perform
some other action (type on the keyboard, move the mouse, utilize the
disks) during the prime generation; this gives the random number
generator a better chance to gain enough entropy.Exporting your ID
After the generation of your keys above, run gpg -K --keyid-format SHORT to get a list of your key IDs.
Copy your key ID and fingerprint, respectively. Follow the following example to decipher the output.
# Example output
sec   rsa4096/058B1DC9 2020-10-21 [SC]
      074B3E1C1CE8962C6E3E6F84AA9013DDAAC1B9B3

# Your key ID would be
058B1DC9

# And your key fingerprint would be
074B3E1C1CE8962C6E3E6F84AA9013DDAAC1B9B3Exporting your Public Key
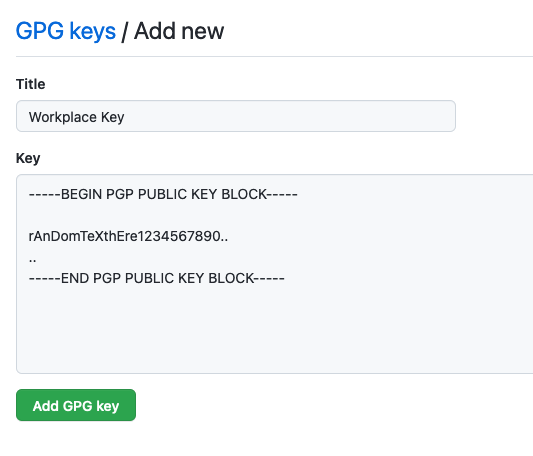
With the ID from before, run the following command gpg --armor --export [Key ID].
You should see an output similar to this;
-----BEGIN PGP PUBLIC KEY BLOCK-----

rAnDomTeXthEre1234567890..
..
-----END PGP PUBLIC KEY BLOCK-----Copy the entire block, from the first dash of the BEGIN text to the last dash of the END text.
This is what you will paste in your GitHub (Or your preferred version control cloud hosting platform) settings.
Setting up Git
Configure signing program
Run the following command to set the default GPG program for git;
git config --global gpg.program $(which gpg)
Configure signing key
Using your key fingerprint from way earlier, run the following command
git config --global user.signingkey [Key Fingerprint]
Configure signing behaviour
For best practice, run the following command to enable signing all commits by default (as opposed to having to type the -S flag for each command).
git config --global commit.gpgsign true
Setting up GitHub
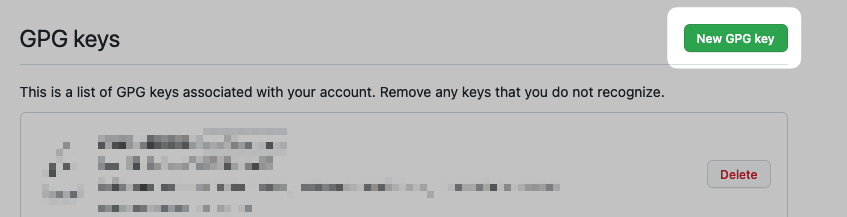
- Visit your GPG keys settings page here.
- Click on the New GPG Key button
- Paste your public key from earlier, click on Add GPG key
(Complete security verification, if necessary)
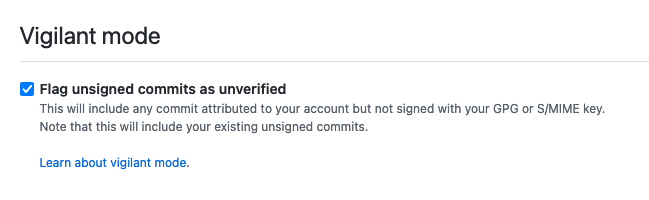
- Enable “Vigilant mode”
Using it!
When you perform a commit (e.g. git commit -S -m "Commit Message Here"), you'll be prompted by the pinentry-mac prompt for your key password. Only after a successful authentication will the commit be signed and ready to go!
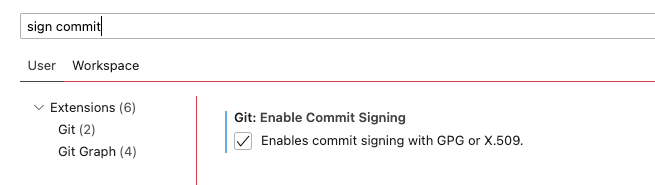
Set up commit signing for VS Code
Open up your user preferences UI (⌘ + ,) and enable the Git: Enable Commit Signing option!
Acknowledgements
- Thanks to Troy Fontaine's guide for the pinentry fix
Comments ()